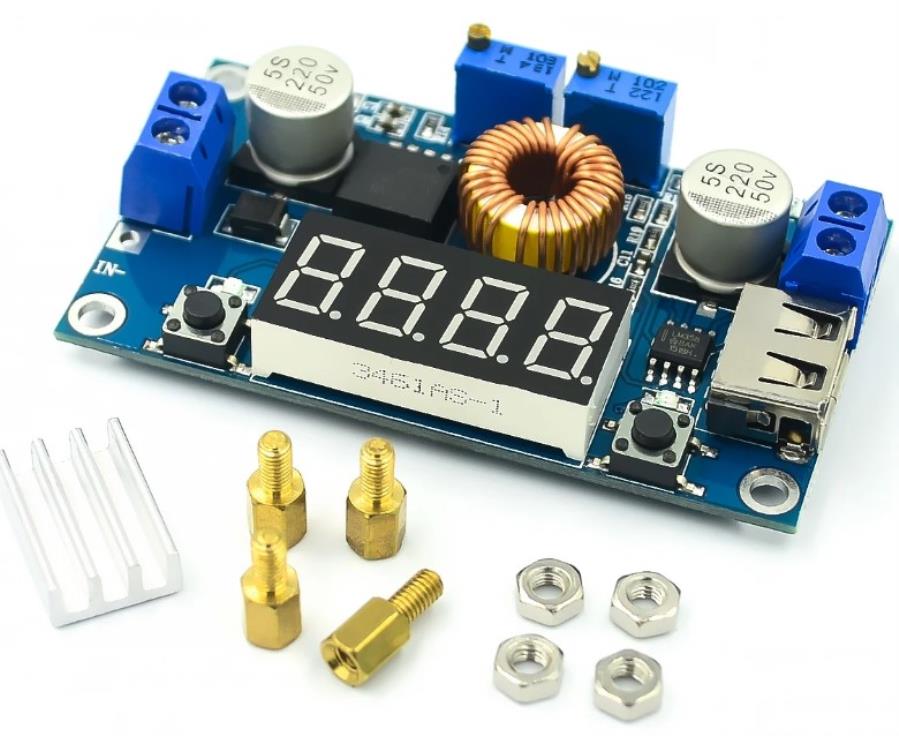
This constant current converter has several functions:
- A voltage step-down module
- A battery charger (lithium, Ni-Cd, Ni-MH)
- A constant current driver for high-power LED lighting modules.
This module is based on the XL4015 Steep Down DC-DC regulator, which is an ideal integrated circuit for designing buck switching power supplies.
It is capable of supplying an output power of up to 75 W with a maximum current of up to 5 A (with heat sink and fan). When handling such a high current level, the heatsink may become hot, so it is recommended not to set the converter to this level.
This device supplies an adjustable output voltage of 1.25 to 36 Vdc, but requires an input voltage higher than the output voltage. The input voltage must be 1.25 V higher than the output voltage and must be between 4 and 38 Vdc.
This module minimizes the use of external components to simplify power supply design. It features a precision potentiometer. Adjust the output voltage to the desired level.
Use as a battery charge regulator
- Determine the battery's float charge voltage and charge current. If the lithium battery parameter is 3.7V/2200mAh, then the float charge voltage is 4.2V, charging current 1C, i.e., 2200mA)
- Under no-load conditions, set the module's digital meter to the "Display Output Voltage" interface, adjust the "constant voltage potentiometer" so that the output voltage reaches the float charge voltage;
- Set the digital meter to the (display output current) interface, to do this, directly short-circuit the output end of the module (find a thick wire short-circuit output end), adjust the "constant current potentiometer" so that the current value on the digital meter reaches the desired charging current value.
- The default LED charging current is 0.1 times the charging current. The battery current in the charging process is gradually reduced, from constant current charging to constant voltage charging, if the charging current is set to 1A, then when the charging current is less than 0.1A, the blue light is off, the green light is on, and the battery is fully charged. charged.
- Connect the battery and charge it.
- The above steps 1 to 4 are performed by connecting the input to the power supply or power source, and without connecting the output to the battery.
Use as a constant current driver for high-power LED lighting
- Determine the working current and working voltage required to drive the LED;
- Under no-load conditions, set the digital meter to the (Output voltage on the display) interface, adjust the "constant voltage potentiometer" so that the output voltage reaches the LED's working voltage;
- Set the digital meter to the (Output current on the display) interface, Directly short-circuit the output end of the module (find a thick wire short-circuit output end), adjust the "constant current potentiometer" so that the current value on the digital meter reaches the preset LED working current;
- Connect the LED
- Steps 1, 2, and 3 are performed with the input connected to the power supply; the output is not connected to the LED, so there is no load.
Points of Interest
Voltage and Ammeter Self-Calibration
The self-calibration function is an optional feature that may or may not be used.
This function is used to calibrate the accuracy of the voltage and current display, not to adjust the output voltage and current value.
This function is designed to meet your highest accuracy requirements. You only need to calibrate once to obtain the value across the full range.
- When the built-in digital meter displays the output voltage, press and hold the right button for 2 seconds and release it. Then, the voltmeter and the "OUT" output voltage indicator flash synchronously, entering output voltage calibration mode. Similarly, when the voltmeter displays the input voltage, press the right button for 2 seconds and release it. The voltmeter and the "IN" input voltage indicator flash synchronously, entering input voltage calibration mode. When the voltmeter displays the output current, press the right button for 2 seconds and release it. The ammeter flashes, entering output current calibration mode.
- Touch the right button, the voltage (current) increases by one; Tap the left button, the voltage (current) decreases by one unit; because the voltage value of a unit is less than 0.1 V, you must press it 1-5 times continuously to see the voltmeter change by 0.1 V. The specific number of consecutive presses depends on the current display voltage value; the higher the current display voltage, the fewer times you need to press it.
- After completing the voltage (current) adjustment, press and hold the right button for 2 seconds and release it. At this point, you can exit calibration mode and save all parameter settings.


 Available


